Electric Chain Hoist Remote Control: Upgrade Options Compared
Published: Author: Lisa
Adding remote control to an electric chain hoist is an electrical job, not a mechanical rebuild. The hoist, chain and trolley stay as they are; a receiver is paralleled into the existing control circuit so the pendant keeps working, and the operator gains a transmitter. Three things decide the cost and the risk: how many motions the hoist has, whether it is single or dual speed, and the voltage of the contactor coils.
This guide covers what an industrial remote control upgrade changes inside the panel, how to size the transmitter to the hoist, and the checks that should be done before and after power-up.
What the upgrade actually changes
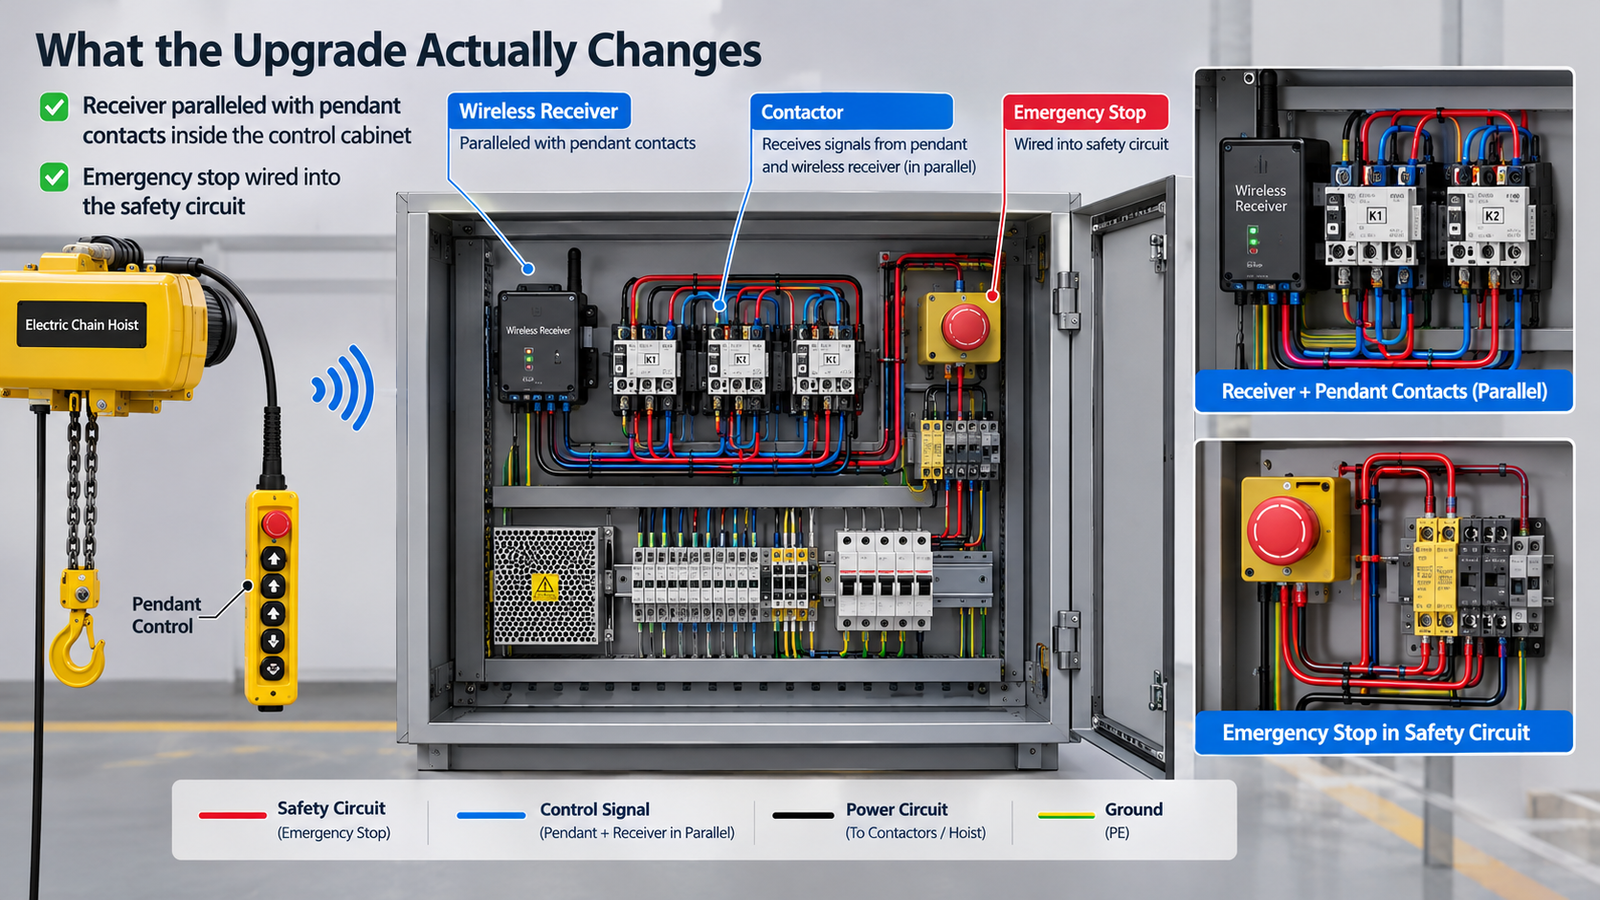
A radio remote does not replace the pendant on most retrofits — it runs alongside it. The receiver’s relay outputs are wired in parallel with the pendant’s direction contacts, so the existing control circuit still works if the transmitter is lost, flat or left in a locker. That decision is worth making deliberately: removing the pendant entirely is possible, but it removes the fallback that keeps a hoist usable on the day the battery dies.
Item
What changes
Watch point
Receiver
New component inside or beside the control cabinet
Must be rated for the control-circuit voltage, not the motor voltage
Control wiring
Receiver outputs paralleled with pendant direction contacts
Common terminal must be shared; mixing two commons causes phantom movements
Emergency stop
Transmitter E-stop must act on the hoist’s safety circuit
Wired in series with the main contactor coil, never to a spare output
Pendant
Retained unless deliberately removed
Two control sources must be interlocked so only one is active
Antenna
Mounted outside the steel cabinet
Inside a closed metal enclosure the range collapses
Hoist itself
No mechanical change
Condition of contactors and limit switches determines whether the upgrade is worth doing
The hoist is the fixed part of the equation. The electric chain hoist range sold for this kind of retrofit runs from 0.5 to 25 tonnes on 380 V three-phase supply, and most units in service already have a pendant with the direction contactors the receiver needs to drive.
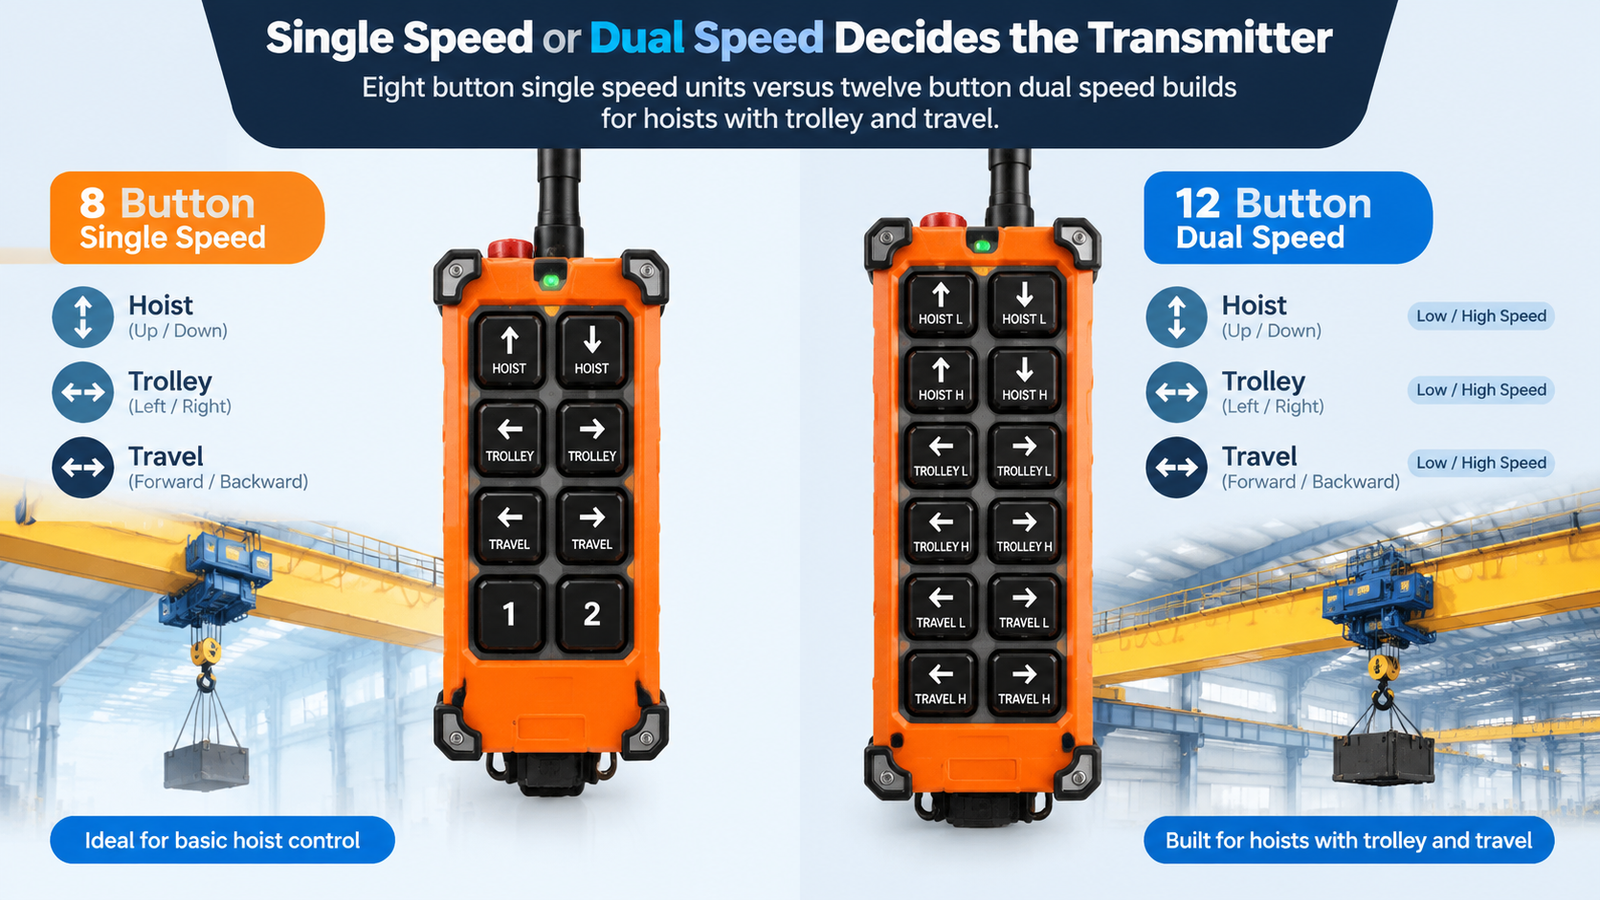
Single speed or dual speed decides the transmitter
Count the motions first. A basic chain hoist has two — up and down. Add a trolley and you have four. Add long travel on a gantry and you are at six, and that is before any auxiliary function such as a rotating hook, a second hoist or a work light.
Single-speed hoist with no trolley: two motions, but you still need start and stop on the transmitter, so a compact eight-button unit fits. The F21-E1B remote control is the standard answer here — eight buttons, six single-speed directions plus start and stop, IP65, 100 m class range, and a receiver available in 380 V standard with 24 V and 220 V options.
Single-speed hoist with trolley: four motions. An eight-button transmitter covers hoist up/down and trolley left/right, but check the button count against the panel before ordering — a common mistake is to order eight buttons for a machine that needs ten.
Dual-speed hoist: each direction now needs two steps, so the button count doubles for the same motions. A twelve-button dual-speed build such as the F24-12D is the usual fit, and the receiver must support the two-speed contactor arrangement.
Hoist plus trolley plus travel, dual speed: twelve buttons and a dual-speed receiver, or a joystick unit if the operator needs proportional control rather than stepped.
For hoists that only run one direction pair, the compact F24-8S / 8D wireless remote control keeps the transmitter small enough for a belt loop while still covering four motions with start and stop.
Get the control voltage right before ordering
The receiver is powered from the control circuit, not from the motor supply, and this is where most wrong orders originate. A hoist running on 380 V three-phase may still have a 24 V, 36 V, 48 V or 220 V control circuit — the motor voltage tells you nothing about the coil voltage.
Two ways to find out: read the coil marking on the direction contactors, or measure across the coil terminals while the pendant is pressed. If the fleet is mixed, a wide-range receiver avoids stocking two part numbers — the F24-12S receiver accepts AC/DC 18–65 V and 65–440 V from the same unit.
If the hoist is being moved between sites with different control voltages, the wide-range receiver is cheaper than a second system; where the voltage is fixed and known, a single-range unit is simpler to wire.
Receiver placement, antenna and interference
The receiver is a radio device mounted on a steel machine, which is the least favourable place for one. Three placement rules prevent most of the range and reliability complaints that follow an otherwise correct installation.
Do not bury the receiver inside a closed metal cabinet. If it must live inside, bring the antenna out through a gland and mount it on the outside face.
Keep the antenna away from motor cables and VFDs. Variable-frequency drives are the most common source of intermittent command loss on hoists that were converted from pendant control.
Keep the antenna vertical and clear of the chain path. An antenna bent around a cabinet edge or pressed against the hoist frame loses more range than a lower-rated system with a clean installation.
The wiring side follows the same logic: signal wiring routed alongside motor cables picks up noise. The terminal-by-terminal layout, including the common, the outputs and the emergency stop loop, is set out in this guide to reading a crane remote control wiring diagram.
Pre-upgrade checklist
The upgrade only makes sense if the hoist is electrically sound. Work through these before the receiver is ordered.
Isolate and prove dead. Lock off the supply and verify at the terminals, not at the isolator handle.
Test every direction contactor. Each one should pick up and drop out cleanly. A sticking contactor will make a new remote look faulty.
Check the emergency stop circuit. Confirm the pendant E-stop drops the main contactor, and identify where the safety chain runs.
Record the coil voltage and the number of motions from the existing pendant legend.
Inspect the pendant cable and gland. If the cable is damaged, the upgrade is the moment to decide whether the pendant stays.
Confirm the hoist limit switches work — upper and lower — before adding a control source that can drive the hoist from a distance.
Testing after installation
Commission in the same order every time, and never skip to a loaded test. First, with no load, press each direction and confirm the hoist moves the way the button says; a reversed direction is two wires swapped at the receiver, not a defective unit. Second, press the transmitter emergency stop and confirm the main contactor drops out and stays out until the start sequence is repeated. Third, walk the full working area with a load attached and confirm the hoist responds at the furthest point the operator will actually stand, not in the middle of the bay. Fourth, switch off the transmitter and confirm the hoist stops and does not restart when the transmitter is switched back on without a deliberate restart.
When replacing the hoist is the better answer
Three conditions make a retrofit the wrong spend: failing contactors, corrosion or heat damage inside the panel, and a hoist that would not pass inspection anyway. There the remote becomes a line item on a hoist replacement. Where the body and gearing are sound but the control layout is dated, the low-headroom and fixed-type versions of the YJ electric chain hoist are the usual path, and they take a receiver as readily as older units.
Conclusion
A chain hoist remote control upgrade is a control-circuit project: count the motions, confirm single or dual speed, measure the coil voltage, and mount the receiver so the antenna can actually radiate. Do those four things and the installation is a half-day job with a predictable result.
If you are converting a mixed fleet and want the transmitter and receiver matched to each hoist’s voltage and motion count, send the pendant legend and coil voltage through the contact form and the configuration can be checked before anything is ordered.
FAQ
Can I keep the pendant after fitting a remote control?
Yes, and in most retrofits you should. The receiver outputs are paralleled with the pendant contacts, so both remain functional. The two control sources must be interlocked so that only one is active at a time, which is normally done with a selector switch in the control circuit.
How long does an electric chain hoist remote control upgrade take?
For a single-speed hoist with two or four motions, the electrical work is typically a few hours including testing: mounting the receiver, paralleling the outputs, wiring the emergency stop into the safety circuit, and commissioning. Dual-speed hoists and machines with several auxiliaries take longer because each motion has two steps to verify.
What happens if the transmitter battery dies mid-lift?
The receiver loses the radio link and drops its outputs, so the hoist stops. It will not restart until the operator re-establishes control with a working transmitter and repeats the start sequence. This is why the pendant is usually kept, and why a spare battery or a second transmitter belongs at the workstation.
Can one transmitter control two hoists?
Only if the receivers are deliberately configured for it, and that is rarely a good idea in a shared bay. The usual configuration is one transmitter paired to one receiver, with the pairing recorded so that a replacement transmitter cannot operate the wrong machine.
Ask for the file, not the mark. Five documents to request before ordering, how to check a declaration against the model in the carton, and the red flags.